Identity based SSH with Vault and Keycloak
Identity based SSH with Vault and Keycloak. | Part 1/3 | by Dishant Pandya | Medium
Excerpt
Part 1 of the comprehensive guide which focuses on individual aspects of the overall configuration. Following is the brief of what each part focuses on: You are using SSH, but are you using it right…
Step by Step Guide for Configuring Vault + KeyCloak OIDC
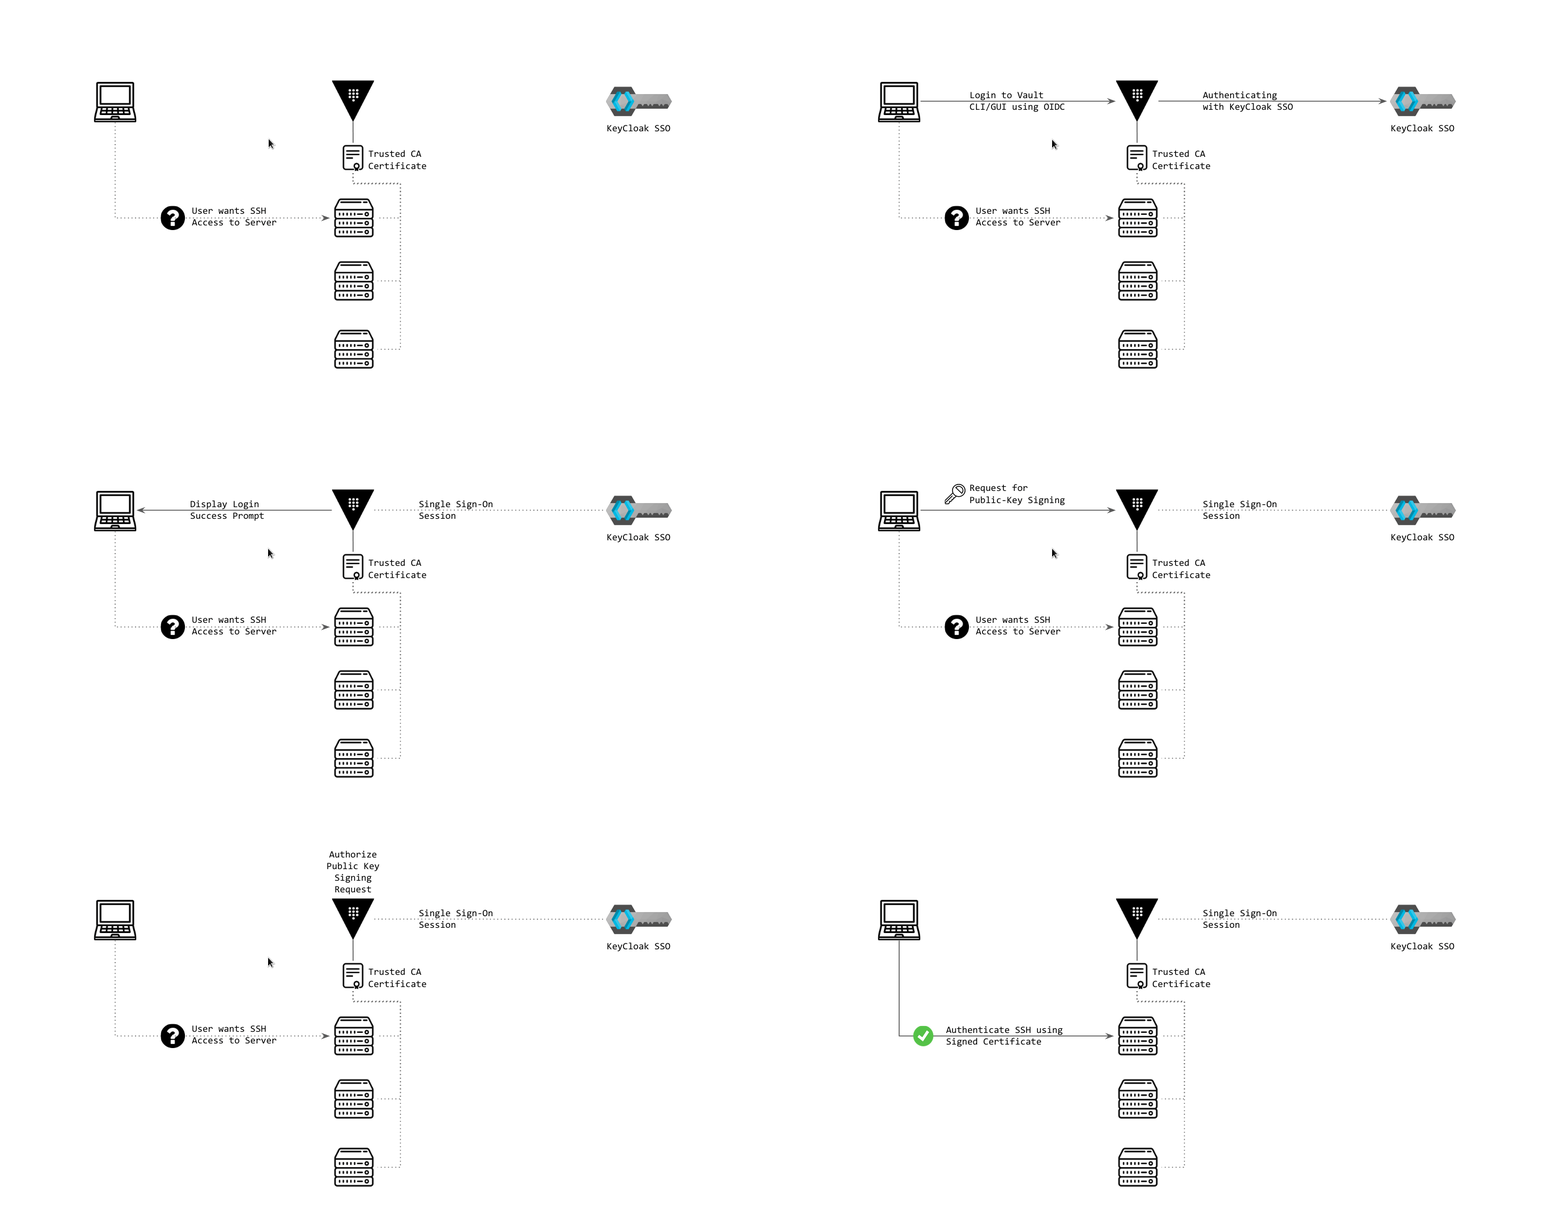
SSH Signed Certificate Authentication | Check above slides here
Part 1 of the comprehensive guide which focuses on individual aspects of the overall configuration. Following is the brief of what each part focuses on:
- Part 1 — Step by Step Guide for Configuring Vault + KeyCloak OIDC
- Part 2 — Step By Step Guide for Configuring Vault SSH Secrets engine for Signed SSH Certificates
- Part 3 — Step By Step Guide for Configuring Vaut SSH Secrets engine for SSH OTP. (coming soon)
Overview
You are using SSH, but are you using it right? Probably not! Chances are that you are using password based authentication or private key based authentication to access your servers. Although necessary to provide administrative access, these methods are non-reliable and insecure at scale.
Private Key based authentication is still widely popular, but many processes, applications and users access the servers, so that will end up with a long list of public keys in the authorized_keys file of the server and it grows till it gets unmanageable, cleaned up and populated again. There’s need for an SSH Solution that is Dynamic, Scalable and Secure, something that uses Identity to Authenticate User, and authorize access against a set of policies, and most importantly, log the activity. We are going to use Hashicorp Vault to provide Authenticatation and Authorization user for SSH access, and Keycloak to demonstrate OIDC integration with Vault.
Use of identity to authorize SSH access will make it scalable and secure. You can simply allow/revoke access to set of servers by applying required set of policies to user, or simply delete the user when they leave the organization. It makes on-boarding of users even easier.
No more dangling private keys and long list if authorized public keys.
Vault
Vault is a powerful secret management tool by Hashicorp, it provides api’s and tooling to store, manage and generate secrets securely. Its has built in secret engines for wide range of applications and services. SSH is one such powerful engine that we are going to use to dynamically generate signed certificates and OTP to access our SSH Hosts.
Keycloak
KeyCloak or its enterprise downstream RedHat SSO is a powerful Identity Provider and Single Sign On Server by RedHat. Its found to be used by many large enterprises such as SalesForce for providing User Management, Authentication and Federation, including RedHat itself. We are going to use it to demonstrate OIDC authentication for vault.
Setup
For this setup we are going to use vagrant to provision VM’s for Vault and SSH Host. Please make sure you have necessary packages installed for it to work.
Pre-Requisites:
- VirtualBox
- Vagrant
Clone this demo repository to setup the test environment.
git clone https://gitlab.com/drpdishant/vault-ssh.git
Start Vagrant Machines:
Go to the cloned directory and run vagrant up
cd vault-ssh && vagrant up
This will provision the VM’s for Vault Server, and 2 SSH Hosts.
- 192.168.56.101 — Vault Server
- 192.168.56.102 — Host 1
- 192.168.56.103 — Host 2
Configure Vault Server
Vault UI will be accesible on https://192.168.56.101:8200/ui , open it in browser to proceed with configuration.
Initialize:
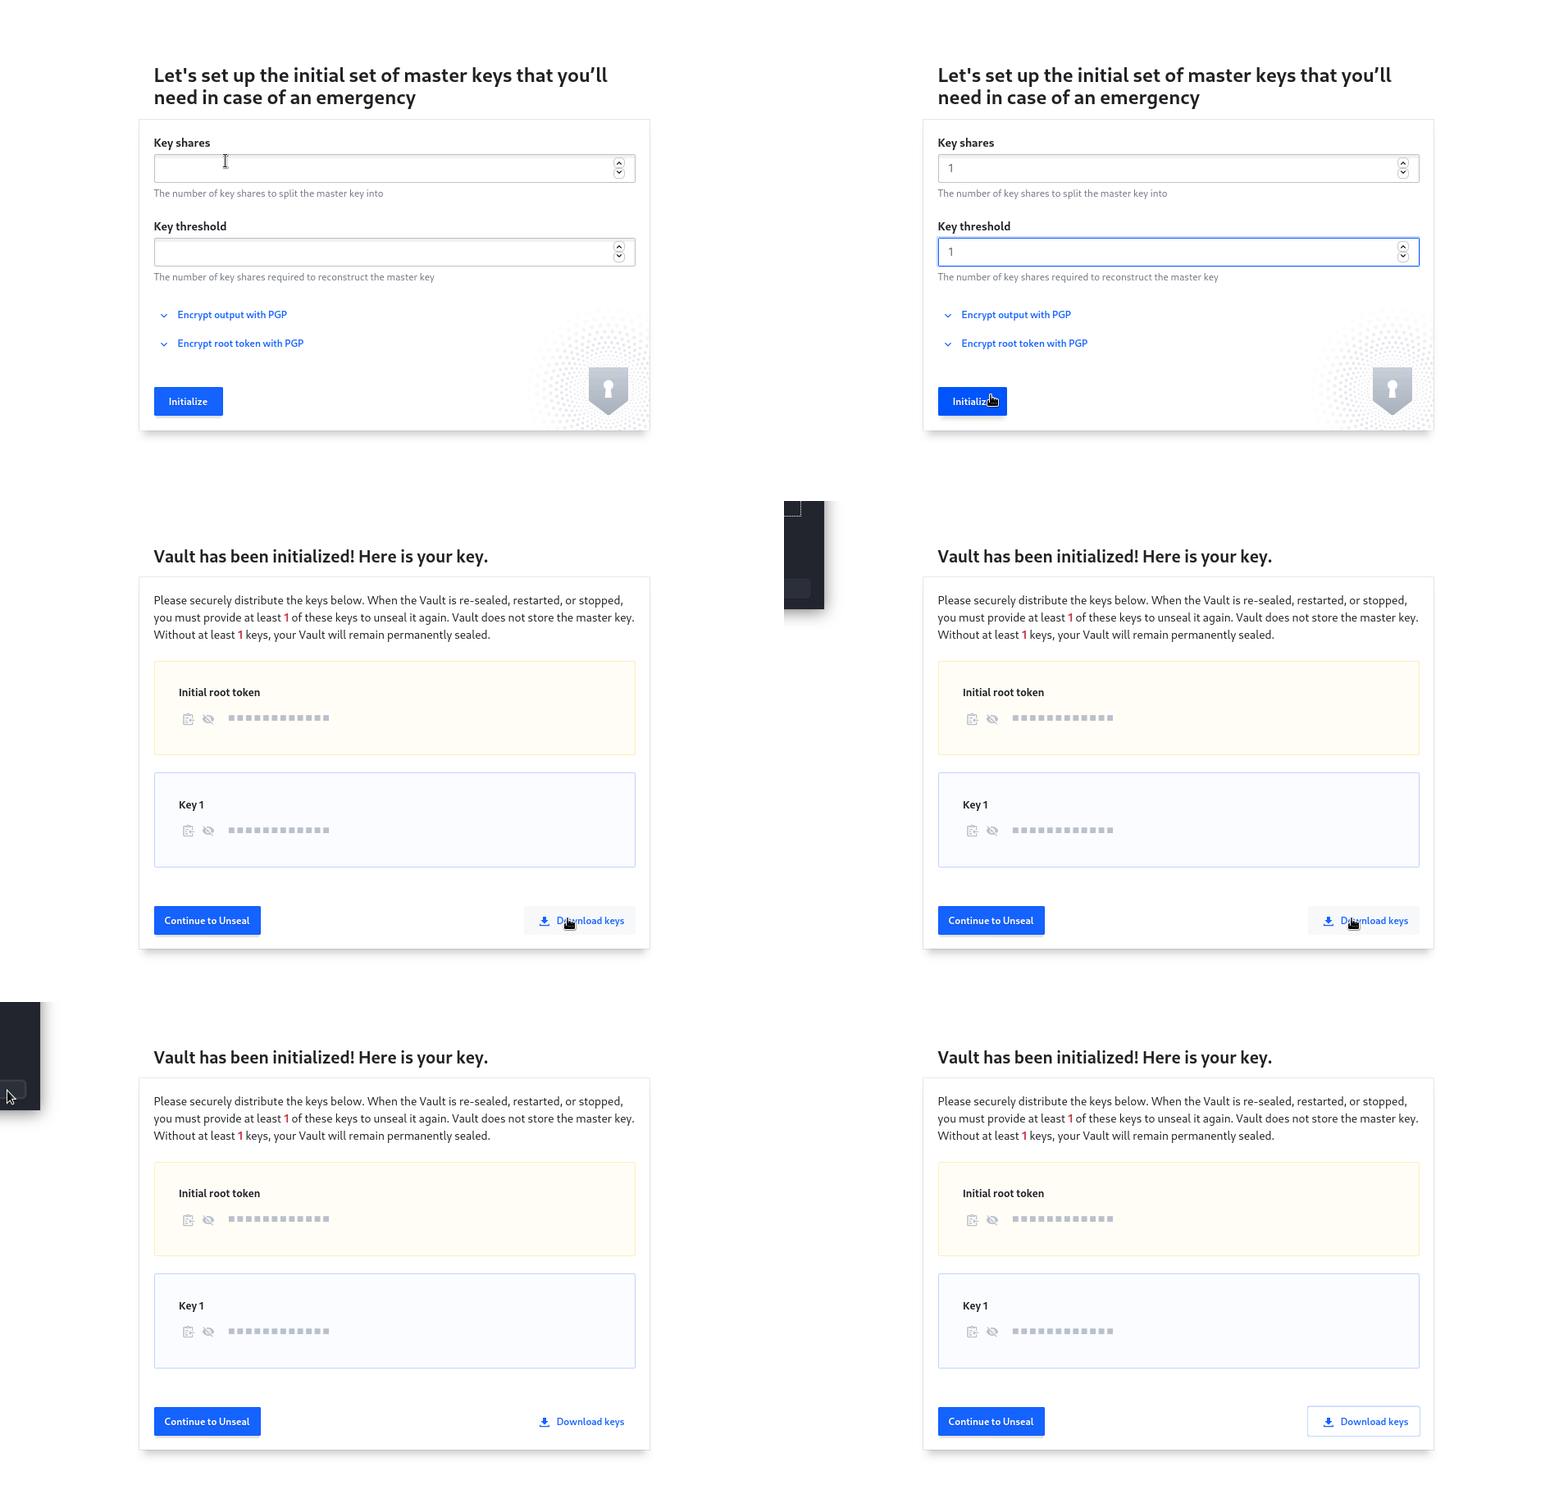
On opening the ui for first time you’ll be taken to initialization page. Here you’ll need to generate master keys and root token. After initialization, vault is sealed, and Master Key Shares will be used to unseal it. Options are as following.
- Key Shares: Number on Key Share to Split Master Key into.
- Key Threshold: Number of unique key shared required to unseal vault. Cannot be greater than the number of Key Shares.
For our demo we’ll set both values to 1 . After clicking on Initialize masked Initial root token, and Master Keys will be displayed. Click on Download keys to download the json file containing keys and root token.
Unseal:
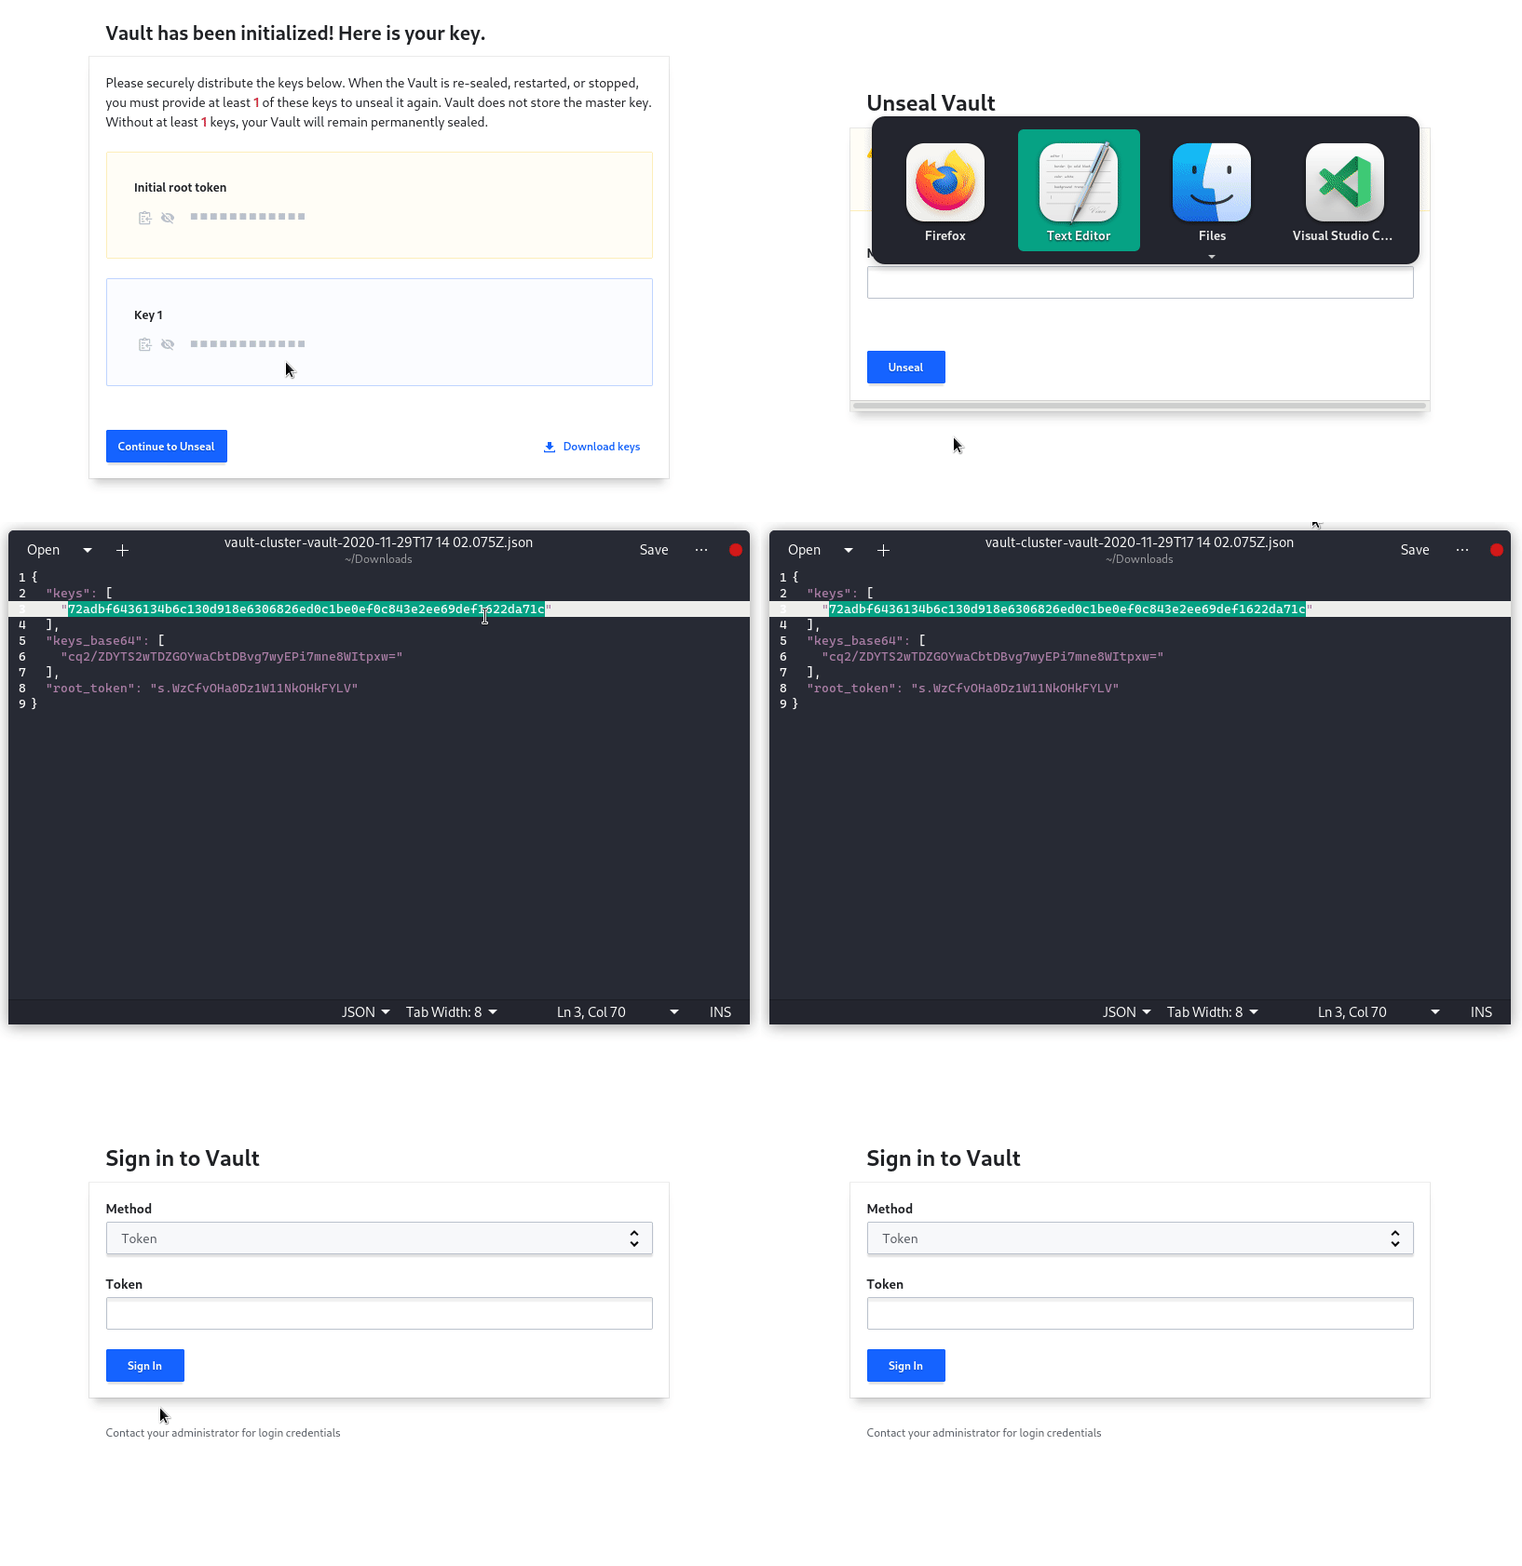
Now we can proceed to unseal Vault using the key in the downloaded json.
Click on Continue to Unseal and Copy the master key part under the keys block in json.
Sign In:
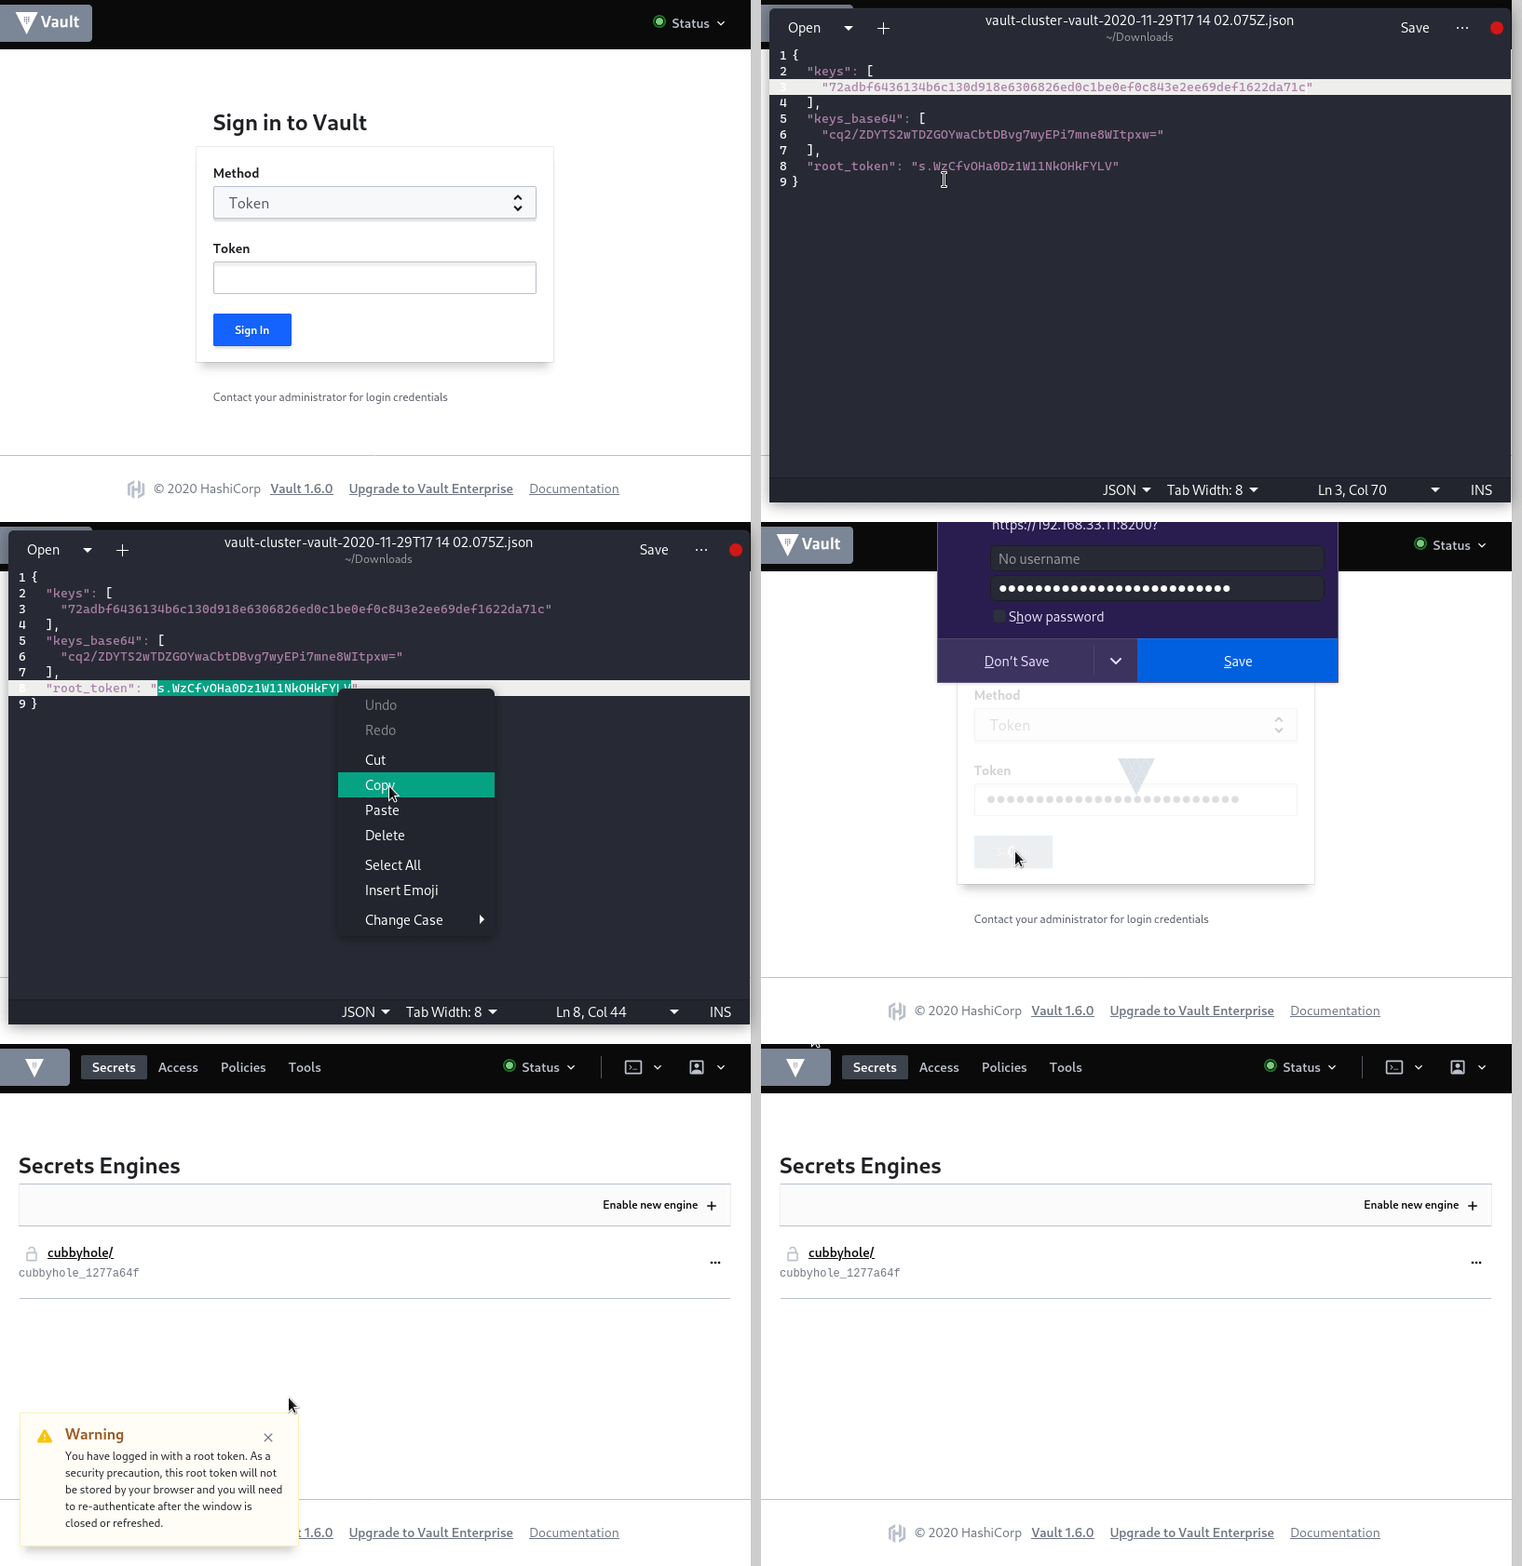
In the next step use the root_token to sign in to vault.
Initialize KeyCloak Server
KeyCloak Server is available at http://192.168.56.101:8080, open it in browser to login. Username and Password combination is admin/admin
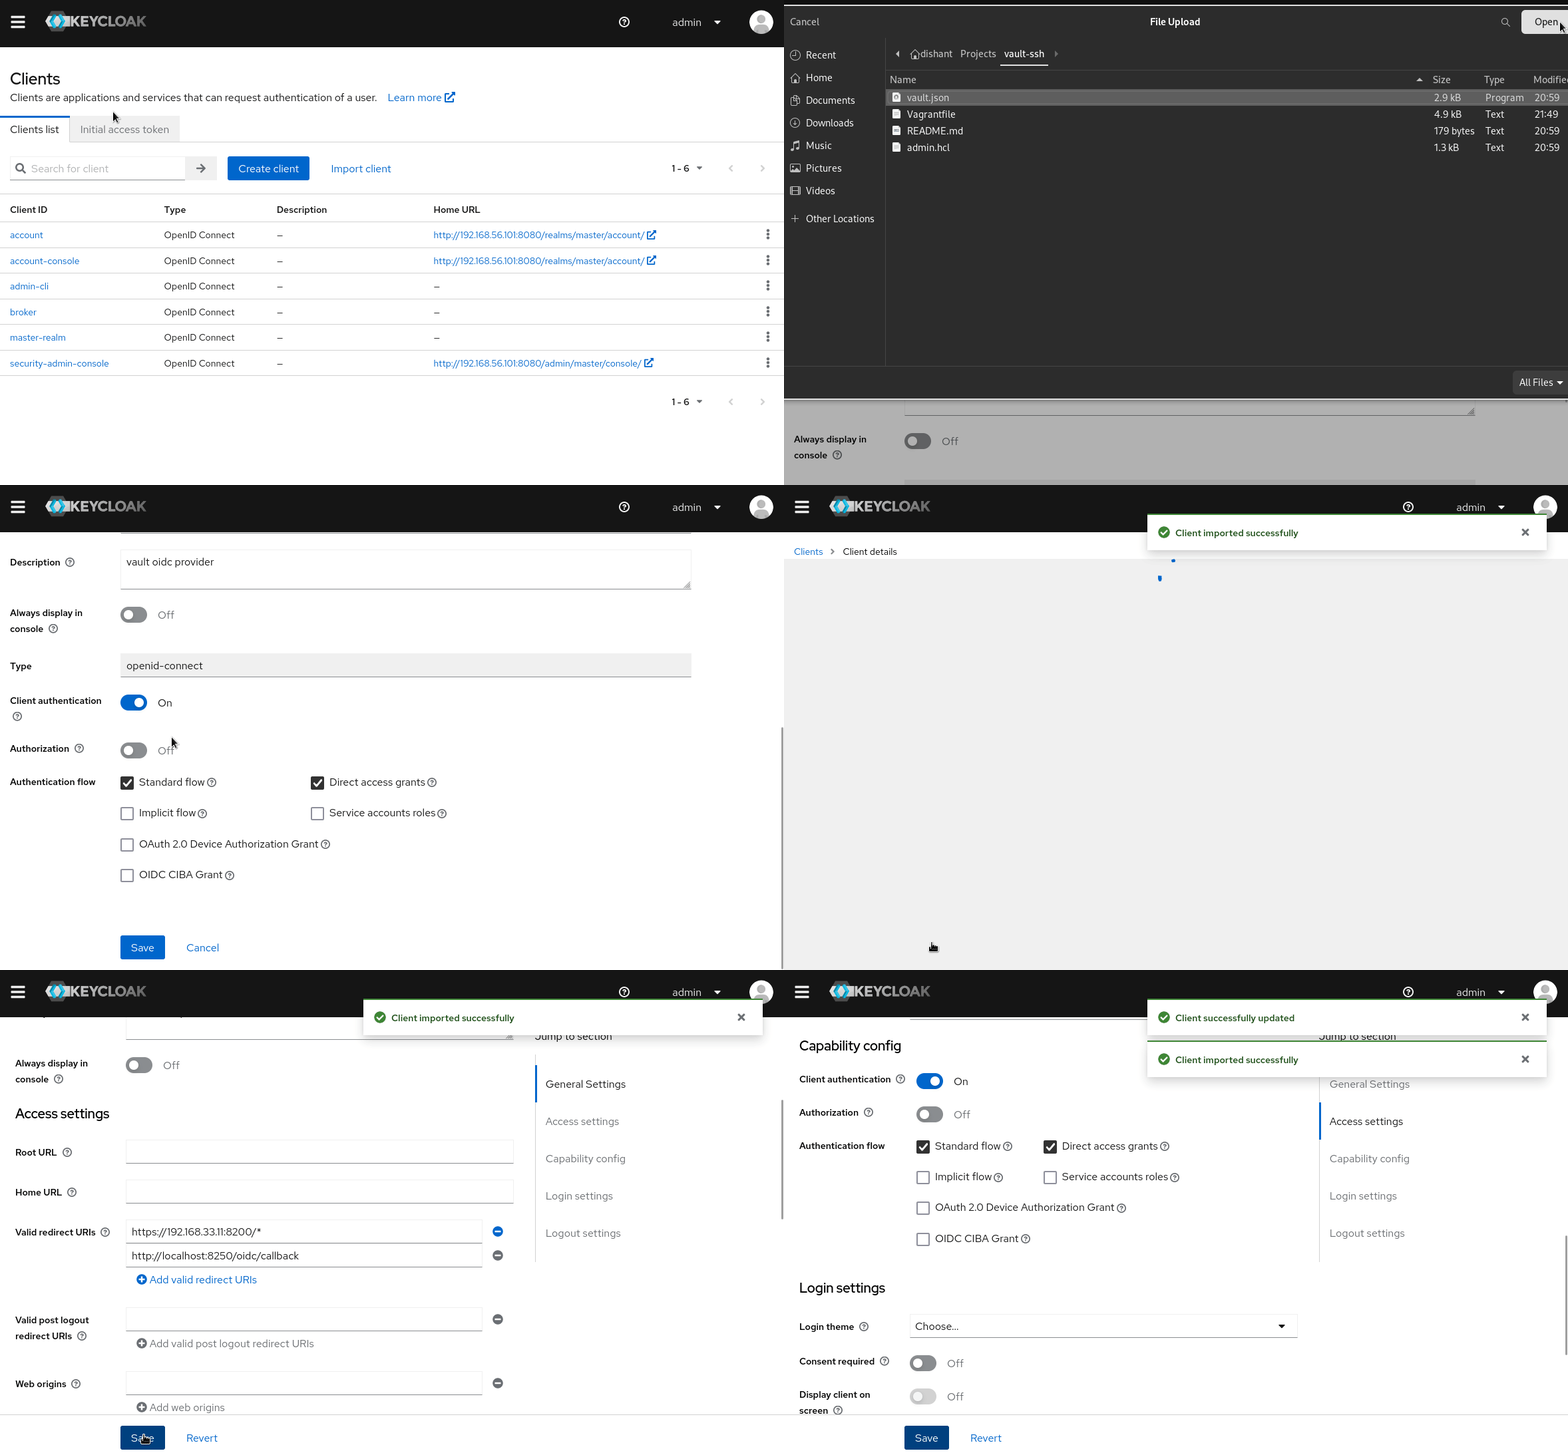
- Configure Vault Client in KeyCloak:
Download the vault.json file containing client configuration from here.
In KeyCloak Admin Console, Goto Clients > Create . Import the downloaded vault.json to configure the vault OIDC client in KeyCloak.
2. Create a test user ‘testing’ in Keycloak:
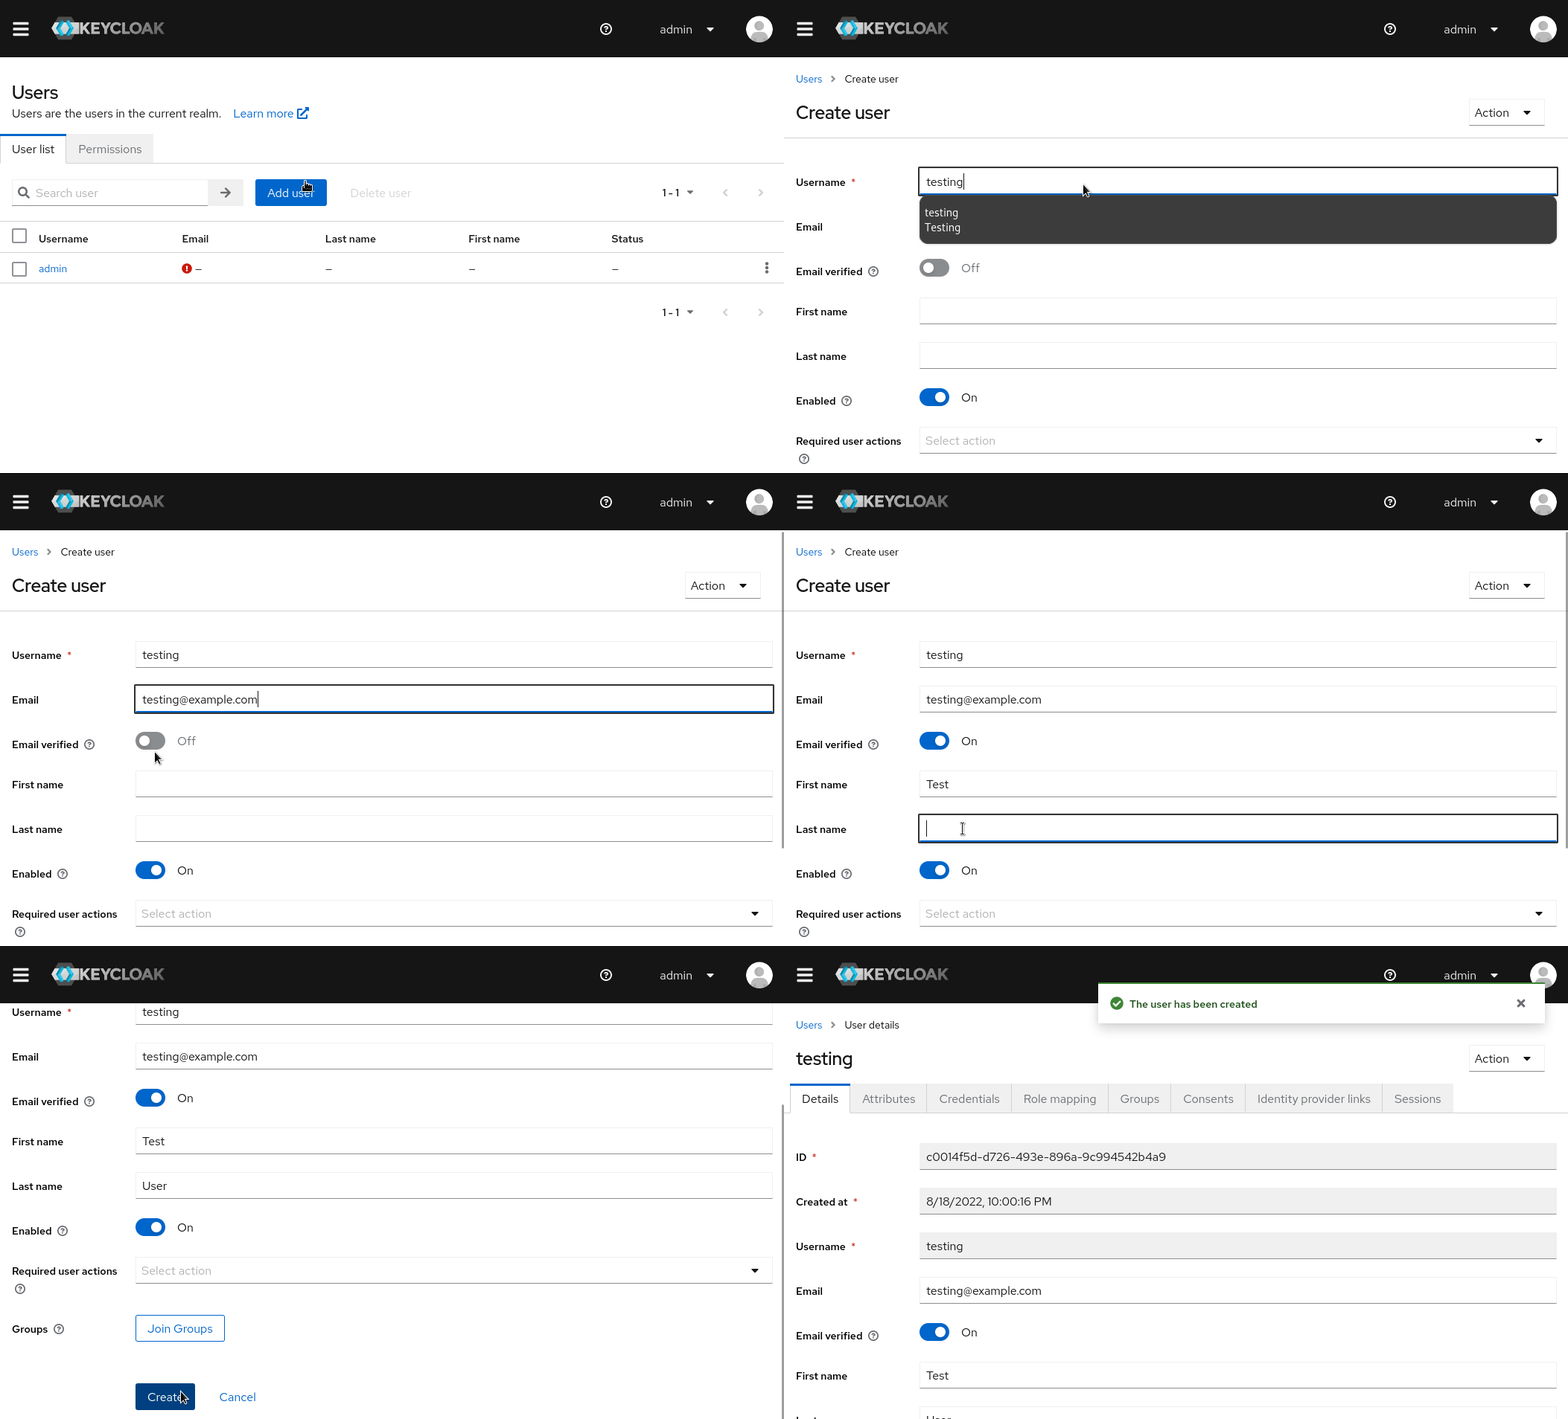
Go to Users and click on add user, and create configure the user as follows:
- Username: testing
- Email: testing@example.com
- First Name: Test
- Last Name: User
- User Enabled: On
- Email Verified: On
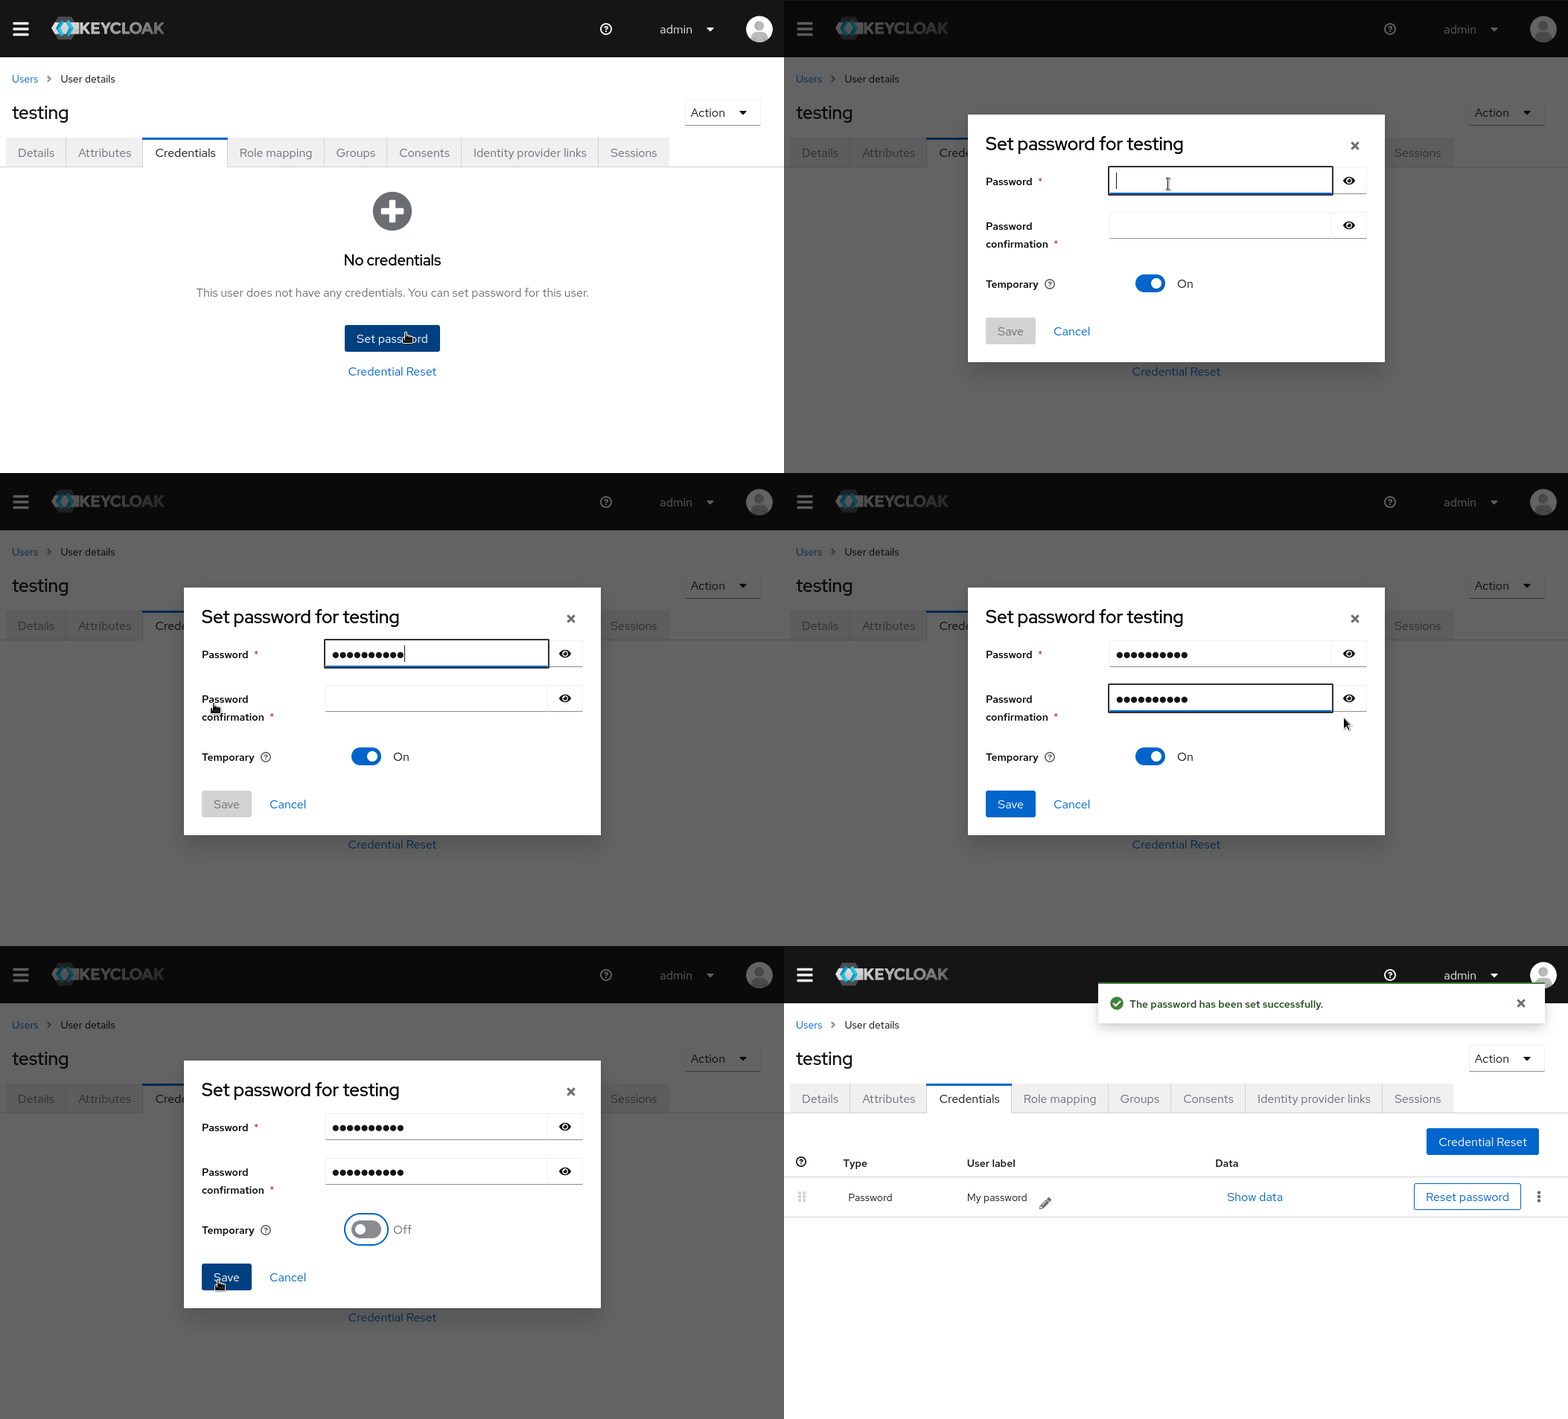
Then go to the Credentials tab for the created user, and Set a new password for user i.e testing123 and set ‘Temporary’ to ‘OFF’. We’ll use this user to login to vault using oidc method.
Create Admin Policy on Vault:
Access Vault Server and Login to Vault CLI:
Get SSH Console into vault server vagrant machine by running
vagrant ssh vault
Configure VAULT_SKIP_VERIFY environment to skip tls verfication as we are using self signed TLS certificate in our demo environment.
export VAULT_SKIP_VERIFY=true
add it to ~/.bashrc to set it automatically on startup. Now proceed with vault cli login. Use the vault root token generated during init.
export VAULT_TOKEN=s.WzCfvOHa0Dz1W11NkOHkFYLVecho $VAULT_TOKEN | vault login -Success! You are now authenticated. The token information displayed belowis already stored in the token helper. You do NOT need to run "vault login"again. Future Vault requests will automatically use this token.Key Value--- -----token s.WzCfvOHa0Dz1W11NkOHkFYLVtoken_accessor qbWsjwwywUJU7Sw0CRoWHlSBtoken_duration ∞token_renewable falsetoken_policies ["root"]identity_policies []policies ["root"]
Create Admin Policy:
Run the following command to create the admin policy, which we’ll use as default in our oidc configuration
vault policy write admin /vagrant/admin.hcl Success! Uploaded policy: admin
Configure OIDC Auth:
- Enable OIDC Auth Method:
vault auth enable oidc
2. Set KC_DOMAIN, KC_CLIENT_ID and KC_CLIENT_SECRET to configure oidc_discovery_url , oidc_client_id and oidc_client_secret respectively:
export KC_DOMAIN=http://192.168.56.101:8080/realms/master
- To get values for KC_CLIENT_ID and KC_CLIENT_SECRET from KeyCloak vault client we previously created:

- For KC_CLIENT_ID, goto clients > vault > settings tab, and copy the client id
export KC_CLIENT_ID=vault
- For KC_CLIENT_SECRET, goto clients > vault > credentials tab, and copy the Secret
export KC_CLIENT_SECRET=3ce2a23d-681e-4804-affe-a4214195a4d2
- Once the variables are set run:
vault write auth/oidc/config \ oidc_discovery_url="$KC_DOMAIN" \ oidc_client_id="$KC_CLIENT_ID" \ oidc_client_secret="$KC_CLIENT_SECRET" \ default_role="default"
3. Now we’ll create the default role for oidc
export VAULT_UI=https://192.168.56.101:8200export VAULT_CLI=https://127.0.0.1:8250vault write auth/oidc/role/default \allowed_redirect_uris="${VAULT_UI}/ui/vault/auth/oidc/oidc/callback" \allowed_redirect_uris="${VAULT_CLI}/oidc/callback" \user_claim="email" \policies="admin"
4. Once that is done we’ll use oidc to login to vault ui.
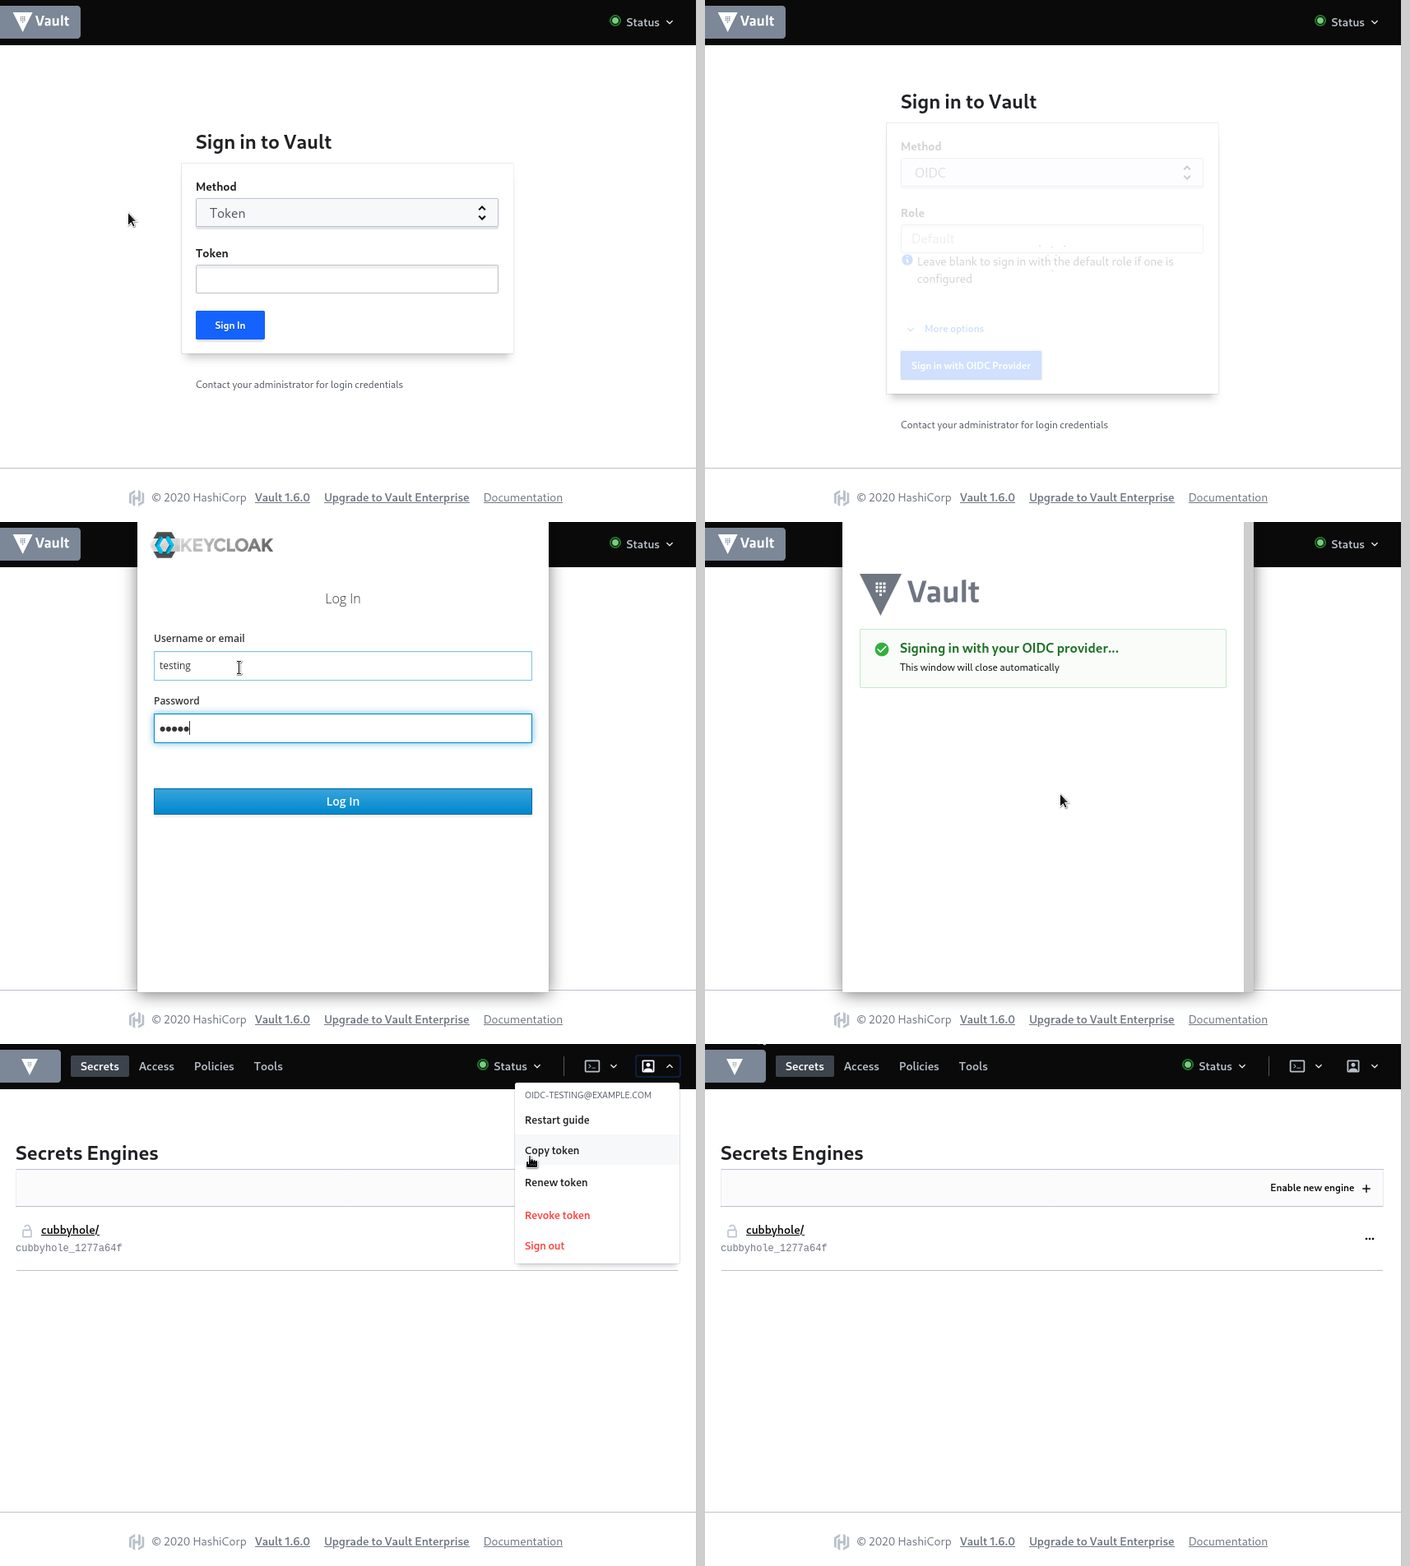
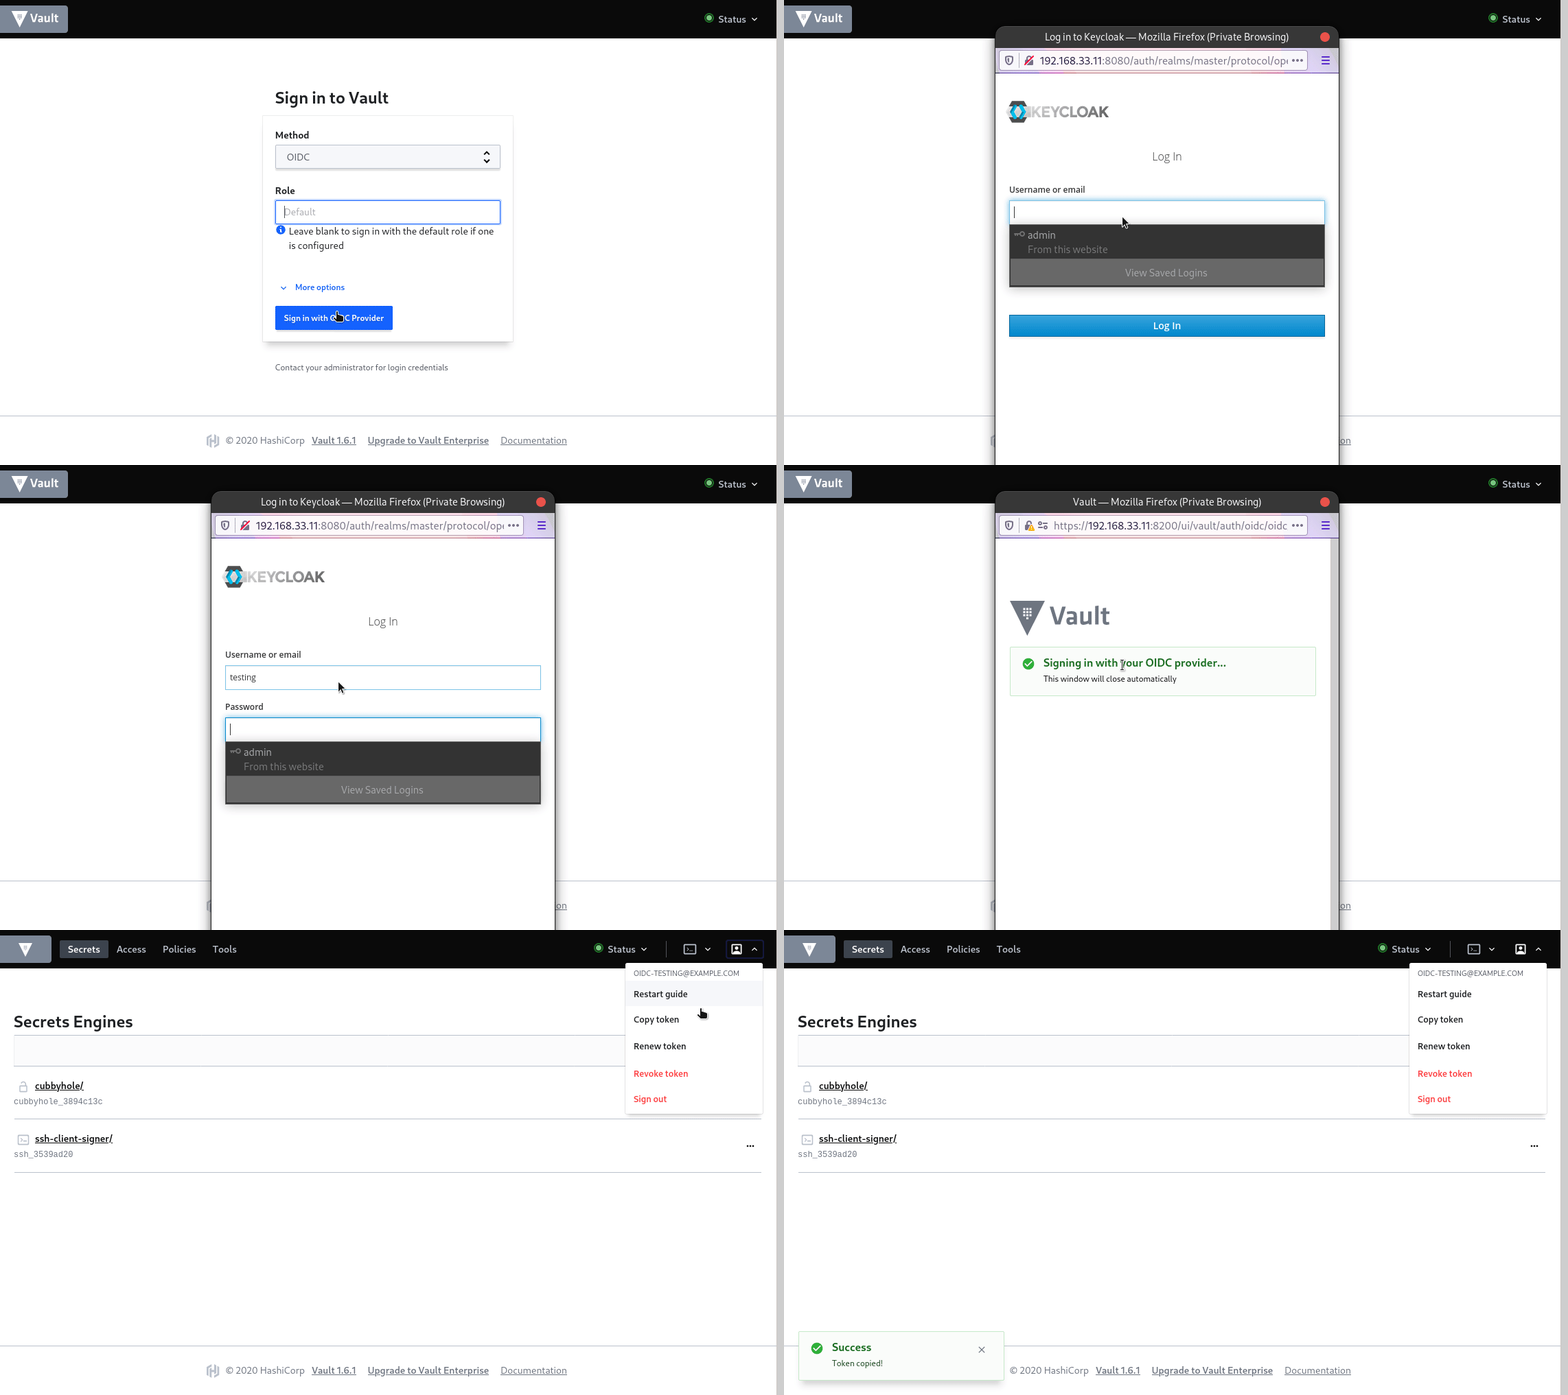
Open vault ui at https://192.168.33.11:8200/ui, under Method drop-down select ‘OIDC’, leave Role blank and we are assiging default role, and click Sign In. You will be redirected to Keycloak Login Page, enter your credentials here, and Login.
Upon successful login, you will be taken to vault and logged as OIDC user testing, with admin policy attached which we have attached with the default OIDC Role. To know much more about Vault OIDC auth check this link.
Login to Vault using Keycloak
Now that we are able to Successfully Login to Vault using KeyCloak, let’s conclude this guide, work is in progress for Part 2, will be soon publishing it.
Part 2: Signed SSH Certificate
In Part 1, we successfully configured OIDC Authentication using KeyCloak, now we’re gonna configure SSH Secrets Engine for Signed Certificates.
Enabling and Configuring SSH Engine
1 . Enable Secrets Engine
Ensure that you are logged into Vault CLI and UI as root and run the following command.
vault secrets enable -path=ssh-client-signer ssh
It will enable an ssh engine at path /ssh-client-signer , you may verify the same from Vault UI.
2. Configure CA for signing keys.
This will configure the CA and Generate a signing key.
vault write ssh-client-signer/config/ca generate_signing_key=true
The CA Public Key will be available at [http://192.168.33.11:8200/v1/ssh-client-signer/public_key](http://192.168.33.11:8200/v1/ssh-client-signer/public_key) . This will be added to the target servers trusted keys to enable access for signed users.
3. Configure Signing Role.
Now that we have configure Signing Authority, we’ll create signing role which enables configuring fine-grained policy for user, defining who gets to sign using which role and ssh user, and access the group of servers allowed in the role.
vault write ssh-client-signer/roles/demo -<<"EOH"{ "algorithm_signer": "rsa-sha2-512", "allow_user_certificates": true, "allowed_users": "ubuntu", "allowed_extensions": "permit-pty,permit-port-forwarding", "default_extensions": [ { "permit-pty": "" } ], "key_type": "ca", "default_user": "ubuntu", "ttl": "30m0s"}EOH
This role will allow authorized user to sign the key to login as ‘ubuntu’ user on the target server, defined by allowed_users parameter. The signed key will be valid for 30 minutes, which you can set as required with ttl parameter. For more details check out API Document for SSH Secret Engines.
configuring ‘permit-pty’ in default extension is necessary as it will allow terminal access.
Configure SSH Host
1.Get ssh access to vagrant host ‘ca_demo’.
vagrant ssh ca_demo
2. Download and Configure CA Public Key as Trusted.
- Download Public Key
sudo curl -k https://192.168.33.11:8200/v1/ssh-client-signer/public_key -o /etc/ssh/trusted-user-ca-keys.pem
- Edit
/etc/ssh/sshd_configand add following line and restart sshd.service
sudo nano /etc/ssh/sshd_config#Place this line at the end on the file and saveTrustedUserCAKeys /etc/ssh/trusted-user-ca-keys.pem# Restart SSH Server to Apply the Changessudo systemctl restart sshd
Client Authentication
1.SSH into vagrant machine ‘ssh_client’ and generate ssh keypair
vagrant ssh ssh_clientssh-keygenGenerating public/private rsa key pair.Enter file in which to save the key (/home/vagrant/.ssh/id_rsa): Enter passphrase (empty for no passphrase): Enter same passphrase again: Your identification has been saved in /home/vagrant/.ssh/id_rsaYour public key has been saved in /home/vagrant/.ssh/id_rsa.pubThe key fingerprint is:SHA256:/rZ/5imrr/vW8Ex10sibkgGiJpSzUfgLCdrXFbLlvIo vagrant@ssh-clientThe key's randomart image is:+---[RSA 3072]----+| +o o. || . * *o . || o o B.oo. . . o ||. . * = . . + +|| . + .S o =.|| ..o + + || E . . B || .. o *. || .*X=*o |+----[SHA256]-----+
2. Configure Vault CLI.
Login the vault ui using oidc method and copy the token for login to cli.
export VAULT_ADDR=https://192.168.33.11:8200export VAULT_SKIP_VERIFY=true ## Use Token Copied from UIexport VAULT_TOKEN=s.6v1Tr7zU3wwpQn2QKYICWQWAecho $VAULT_TOKEN | vault login -
3. Signing SSH Public Key.
vault write -field=signed_key ssh-client-signer/sign/demo \ public_key=@$HOME/.ssh/id_rsa.pub > $HOME/.ssh/id_rsa-cert.pub
This command will authorize the user with vault, and request for the public key at ‘~/.ssh/id_rsa.pub’ to be signed by the CA. We are storing the signed certificate at $HOME/.ssh/id_rsa-cert.pub as ssh client by default looks for this file for any existing signed certificates and uses it to authenticate with ssh hosts. You can check the details of the signed certificate by running
ssh-keygen -Lf ~/.ssh/id_rsa-cert.pub
It will show similar results as below:
/home/vagrant/.ssh/id_rsa-cert.pub: Type: ssh-rsa-cert-v01@openssh.com user certificate Public key: RSA-CERT SHA256:/rZ/5imrr/vW8Ex10sibkgGiJpSzUfgLCdrXFbLlvIo Signing CA: RSA SHA256:uKzJOaH/cPaxmDDgrwAEoo0eY9YUKYh2dqvrno1UYEc (using ssh-rsa) Key ID: "vault-oidc-testing@example.com-feb67fe629abaffbd6f04c75d2c89b9201a22694b351f80b09dad715b2e5bc8a" Serial: 9812201999919852695 Valid: from 2020-12-18T01:17:26 to 2020-12-18T01:27:56 Principals: ubuntu Critical Options: (none) Extensions: permit-pty
Here you can see the Principals (i.e users) that this certificate can be used to login with, its validity, etc.
In the Valid field you can see that it is issued with validity of 30 minutes.
Now lets connect the our SSH Host. Its IP is 192.168.33.12 in our case.
ssh ubuntu@192.168.33.12
Lets recreate the certificate with 30s TTL, and SSH to the host.
vault write -field=signed_key ssh-client-signer/sign/demo public_key=@$HOME/.ssh/id_rsa.pub > $HOME/.ssh/id_rsa-cert.pub ttl="30s"ssh ubuntu@192.168.33.12
From the time key is signed, it will be valid for use for only 30 seconds, if you start ssh session with it, there it’s validity doesn’t depend on certificate’s TTL.
Session’s validity is dependent on ssh server configuration.
Now exit the session an try connecting to it without signing a new certificate. It will show permission denied as our certificate is not valid anymore.
ssh ubuntu@192.168.33.12ubuntu@192.168.33.12: Permission denied (publickey).
This feature of signed certificates, allows us to set validity to access ssh.Let’s say we setup max TTL to 24h so that every day a new certificate needs to be generated, removing any chances of long term access to the server.
This combined with session timeout rules, cleanup rules for authorized keys removes, disallows any unauthorized access. And key signing process can simple controlled by configured ACL policies for users. This provides granular security policies to be applied in comparison to a simple SSH Key Pair.
In the Next Part of this Series we’ll see how we can configure SSH OTP based authentication with help of vault-ssh-helper agent.